As a smart home professional, I believe the best automations are the ones you forget are even there. They work so seamlessly in the background of your life that they feel like a natural extension of your home. And nowhere is this more true than with motion-activated lighting. Done right, it’s a magical convenience. Done wrong, it’s an infuriating mess of lights turning on when you don’t want them to and shutting off while you’re still in the room.
I often see clients buy a basic motion sensor, link it to a light, and then become frustrated with the results. The truth is, creating a truly *good* motion lighting system requires a bit more thought. It requires rules, conditions, and the right hardware for the job. After years of experimenting, I’ve perfected the automations for two of the most high-traffic areas in any home: the hallway and the bathroom.
This is my personal, step-by-step guide to how I’ve set up these crucial spaces. I’ll walk you through the devices I use, the problems I aimed to solve, and the exact automation logic that makes it all work flawlessly.
The Gear: My Tools for the Job
While many devices can be used, my setup relies on a few key components to achieve the best results. The “brains” of this operation is a quality motion sensor with specific features.
- The Motion Sensor: My go-to for these projects is the Aqara Motion Sensor P1. The reason is simple: it uses the fast and reliable Zigbee 3.0 protocol, has a claimed 5-year battery life, and most importantly, it has adjustable timeout and sensitivity settings. This flexibility is critical for solving the common pitfalls of motion lighting.
- The Lights: Any brand of dimmable smart bulb will work perfectly (Philips Hue, Wyze, Kasa, Cync, etc.).
- The Hub: Because the Aqara P1 is a Zigbee device, a compatible hub is required. I use an Aqara Hub M2, but others like SmartThings or a Home Assistant setup with a Zigbee dongle also work.
Project 1: The Intelligent Hallway
The Problem: A hallway light needs to serve two very different purposes. During the day, it should be bright and functional. In the middle of the night, turning on a bright light is a blinding, sleep-disrupting experience. A simple on/off automation won’t work.
The Solution: Create two separate automations that are conditional on the time of day.
Hallway Automation A: Daytime Mode
The Goal: When motion is detected during the day, turn the lights on to a bright, functional level, and turn them off relatively quickly after I leave.
The Automation Logic:
- In my smart home app, I create a new automation.
- The Trigger: “When the Hallway Motion Sensor detects motion.”
- The Condition: I add a condition for the time of day: “Only run this automation between 7:00 AM and 10:00 PM.”
- The Action: “Set Hallway Lights to 100% brightness” and to a cool, daylight white color.
Now, to turn them off, I create a second, corresponding automation.
- The Trigger: “When the Hallway Motion Sensor has detected no motion for 2 minutes.”
- The Condition: “Only run this automation between 7:00 AM and 10:00 PM.”
- The Action: “Turn off Hallway Lights.”
Hallway Automation B: Nightlight Mode
The Goal: Provide a safe, dim path to the bathroom or kitchen at night without waking anyone else up or blinding myself.
The Automation Logic:
- Create a new automation.
- The Trigger: “When the Hallway Motion Sensor detects motion.”
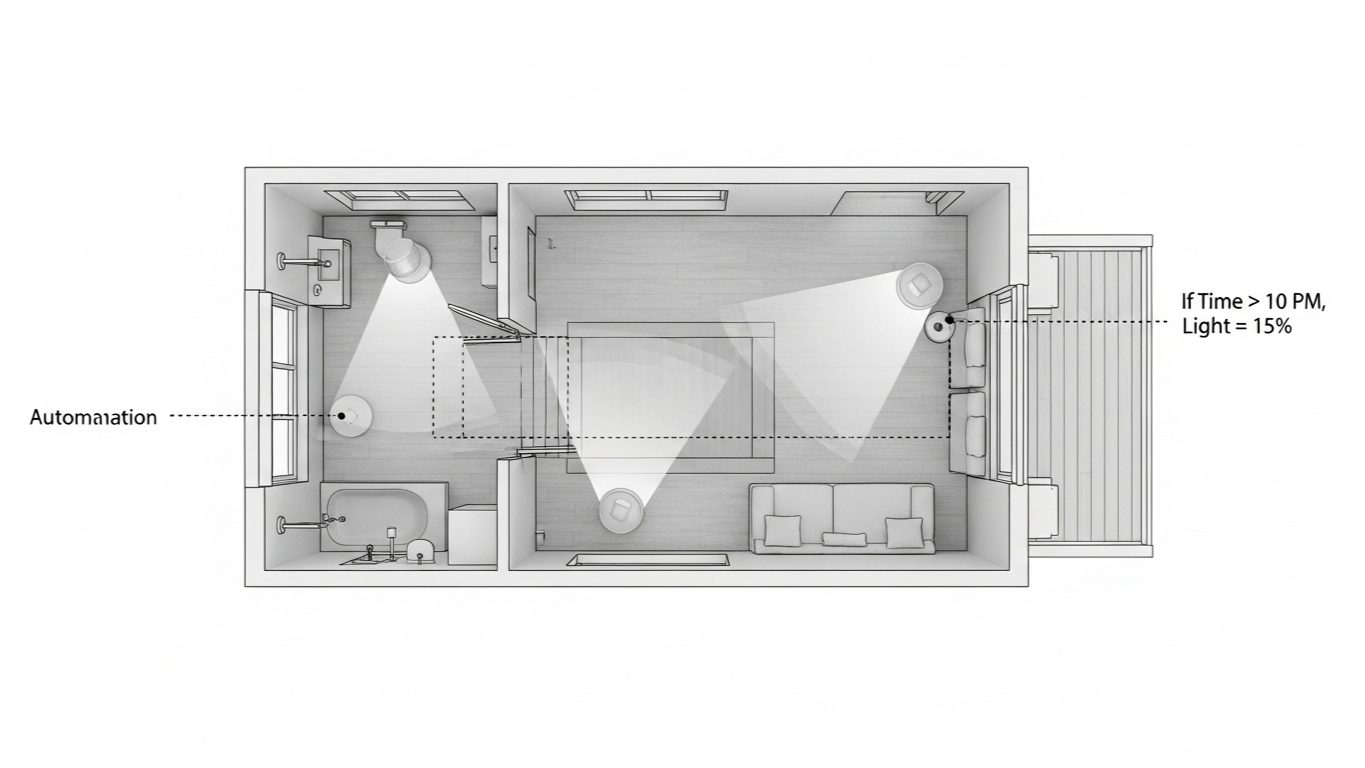
- The Condition: “Only run this automation between 10:01 PM and 6:59 AM.”
- The Action: “Set Hallway Lights to 5% brightness” and to a very warm, soft white color. This low level is just enough to see without being jarring.
And the “off” automation:
- The Trigger: “When the Hallway Motion Sensor has detected no motion for 2 minutes.”
- The Condition: “Only run this automation between 10:01 PM and 6:59 AM.”
- The Action: “Turn off Hallway Lights.”
The Result: The hallway now behaves intelligently. It’s a bright, welcoming space during the day and a safe, subtle pathway at night, all without me ever touching a switch.
Project 2: The Truly Automated Bathroom
The Problem: The bathroom presents unique challenges. You need light, but you also need to solve the infamous “shower problem” (the lights turning off mid-shower) and intelligently control the noisy extractor fan.
The Solution: A multi-layered automation using the specific features of the Aqara P1 sensor.
Solving the “Shower Problem”
A standard motion sensor will quickly stop seeing you behind a shower curtain or door. My solution uses the P1’s key feature.
My Method: The Adjustable Timeout
- I mounted the Aqara P1 on a high shelf where it has a good view of the whole room.
- In the Aqara Home app, I accessed the sensor’s settings and changed the Detection Timeout period to 180 seconds (3 minutes).
Why This Works: Now, even if the sensor doesn’t see me for a minute or two while I’m in the shower, it won’t report “no motion” to the hub until a full three minutes of inactivity have passed. This simple hardware setting prevents the lights from turning off prematurely 99% of the time. It’s the most elegant solution.
Alternative Method (If your sensor lacks adjustable timeout): You can install a simple smart contact sensor on the bathroom door and add a condition to your “turn off” automation: “Only turn off the lights if the bathroom door is open.” This assumes that if someone is in the shower, they’ve closed the door.
The Bathroom Lighting & Fan Automation
This is a more advanced routine that controls both the lights and the fan for ultimate convenience and efficiency.
The Automation Logic:
- The “On” Trigger: “When the Bathroom Motion Sensor detects motion.” (This is the only “on” trigger we need).
- The Actions:
- “Set Bathroom Lights to 80% brightness.”
- “Turn on the Bathroom Fan Switch.” (My fan is connected to a smart switch).
Now for the more complex “off” routine.
- The “Off” Trigger: “When the Bathroom Motion Sensor has detected no motion for 3 minutes” (this matches the timeout I set on the sensor itself).
- The Actions:
- Action 1: “Turn off the Bathroom Lights.”
- Action 2 (The Pro-Tip): Add a “Wait” or “Delay” action. I set mine to wait for 15 minutes.
- Action 3: After the 15-minute wait, “Turn off the Bathroom Fan Switch.”
My Expert Take: This sequence is brilliant. The lights turn off quickly after you leave, saving energy. But the fan continues to run for an additional 15 minutes, giving it plenty of time to fully vent all the steam and moisture from a shower, preventing mold and mildew. It’s a smart solution that a simple motion timer could never accomplish.
The Ultimate Upgrade: For clients who want the absolute best, I add an Aqara Humidity Sensor. We then change the fan’s “off” trigger from a simple timer to a condition: “Turn off the fan only when the bathroom humidity drops below 50%.” This means the fan runs for exactly as long as it needs to, and no longer.
Conclusion: Moving Beyond Simple Triggers
As you can see, a powerful motion-based automation system is about more than just “if motion, then on.” It’s about using the full capabilities of your devices—like adjustable timeouts and time-of-day conditions—to create a system that is nuanced, intelligent, and tailored to the specific needs of each room.
By investing a little more thought into the logic of your automations, you can transform a potentially annoying gadget into an invisible, indispensable part of your home. This is the kind of project that provides real, tangible benefits every single day, and it’s the perfect example of how a truly smart home should feel.