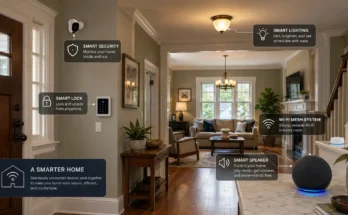
You just brought home a new smart plug, a fancy smart light, or maybe a voice assistant. The excitement is real! You unbox it, plug it in, and the first thing the setup app asks for is your Wi-Fi password. So you give it the password to your main home network. It connects, and everything works. Simple, right?
As a Smart Home Integrator who specializes in network security, I can tell you that this is one of the most common—and most dangerous—mistakes a new smart home owner can make. In my line of work, I consider creating a separate, isolated network for smart devices to be a foundational security protocol. It’s not a suggestion; it’s a necessity.
In this guide, I’ll explain exactly why this is so critical and walk you through the step-by-step process of setting up a “Guest” network specifically for your IoT (Internet of Things) devices. This is a pro-level move that will dramatically improve your home’s digital security.
The Digital Moat: Why Your Smart Devices Need Their Own Village
To understand why we do this, I use a simple analogy with my clients: Think of your main Wi-Fi network as your castle. Inside this castle are your most valuable assets: your personal computers, your smartphone, your work laptop, and any network-attached storage (NAS) with your family photos and private documents. You trust everything inside these walls.
Now, think of your smart devices—plugs, lights, cameras, etc.—as the villagers and merchants who want to set up shop outside your castle. Many of these devices, especially budget-friendly ones, are not built with the same level of security as your laptop. They can have vulnerabilities that could potentially be exploited.
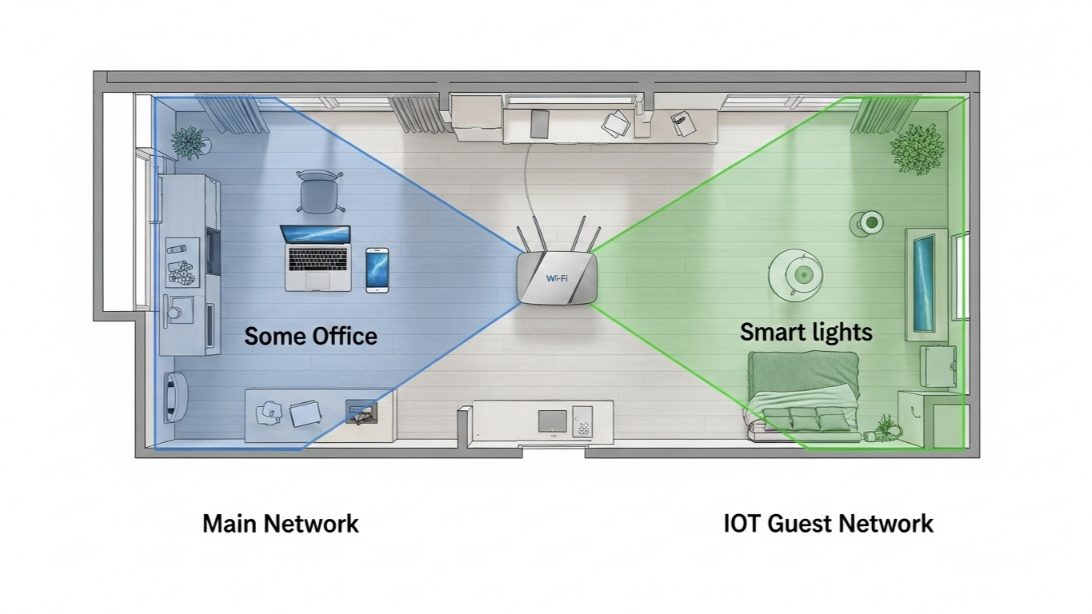
If you let all those villagers live inside your main castle (your primary Wi-Fi network), and one of them has a security flaw, a hacker could potentially use that insecure smart plug as a gateway to attack your laptop and steal your personal data. By creating a separate “Guest” or “IoT” network, you are essentially building a village outside the castle walls with its own moat. If a device in the village gets compromised, the attacker is trapped there, unable to cross the moat and get into your main castle. This concept is called network segmentation, and it’s a cornerstone of good cybersecurity.
Step-by-Step: Creating Your IoT Guest Network
The good news is that nearly all modern Wi-Fi routers have a “Guest Network” feature built-in. The exact steps might vary slightly depending on your router’s brand (e.g., Netgear, TP-Link, Eero, Google Nest Wifi), but the core principles are always the same.
- Log In to Your Router’s Admin Panel: Open a web browser and type in your router’s IP address (commonly 192.168.1.1 or 192.168.0.1) or use the dedicated mobile app for your router system (like Eero or Google Home). You’ll need your router’s admin username and password.
- Find the “Guest Network” Setting: Look for a section in the settings menu labeled “Guest Network,” “Guest Wi-Fi,” or sometimes “Guest Access.”
- Enable the Guest Network: There will be a simple toggle or checkbox to turn the feature on.
- Configure the SSID (Network Name): Give your new network a clear, distinct name. I recommend something like “MyHome_IoT” or “SmartDeviceNet.” This avoids confusion with your main network.
- Set a Strong, Unique Password: Do NOT reuse your main Wi-Fi password. Create a completely new, strong password just for this network. Since only your devices will use it, you can make it long and complex.
- THE MOST IMPORTANT STEP: Enable Client Isolation: Look for a checkbox labeled “Allow guests to see each other and access my local network,” “Client Isolation,” or “AP Isolation.” You want to DISABLE access to your local network and ENABLE isolation. This is the digital moat. It prevents devices on the IoT network from being able to see or communicate with your main network (your castle) OR with each other.
- Save and Apply: Click the “Save” or “Apply” button. Your router will restart its Wi-Fi signal, and your new IoT network will now be visible and ready for your devices.
The “Innocent” Smart Plug That Wasn’t
I was hired by a client, David, to do a general smart home security audit. He was tech-savvy but had, like many, connected about 20 different smart devices from various brands directly to his main Wi-Fi network.
The Investigation: During the audit, we found that a no-name brand smart plug he’d bought online was “phoning home” to a suspicious, unencrypted server in another country every few minutes. While we couldn’t prove malicious intent, it was a massive security red flag. That plug was on the same network as his work computer, which contained sensitive company data.
The Solution: The fix was immediate and straightforward.
- We set up a new “David_IoT” guest network on his router with strict client isolation enabled.
- We spent the next hour methodically going through every smart device in his home—lights, plugs, speakers, cameras—and reconnecting each one to the new, isolated IoT network. His main network was now reserved only for his trusted devices: his family’s phones, tablets, and computers.
- We threw away the suspicious smart plug.
The Result: David now has complete peace of mind. He knows that even if one of his many smart gadgets has a vulnerability, it’s contained within the “village.” It can’t be used as a stepping stone to attack his “castle.” This exercise in digital hygiene dramatically improved his security posture with zero impact on his daily convenience.
I Can’t Connect to My Chromecast/Sonos on the IoT Network!
This is a valid and common issue that arises after setting up network segmentation. A client will move their Sonos speaker or Chromecast to the IoT network, but then their phone (on the main network) can no longer “cast” to it or control it directly.
The Challenge: Devices that rely on local network discovery (like Sonos, Chromecast, and some printers) need to be on the same network as the device controlling them. The “Client Isolation” feature we enabled is specifically designed to prevent this, and it’s doing its job perfectly.
The Expert Solution: A Two-Network Approach.
- IoT Network (“The Village”): This network is for the vast majority of your devices that are controlled via the cloud. This includes most smart plugs, lights (Philips Hue, Wyze), thermostats (Nest), and security cameras. You control them through their respective apps, which communicate over the internet, so local network access isn’t needed.
- Main Network (“The Castle”): Keep your trusted personal devices here (phones, laptops). ALSO, keep any devices that require local network discovery to function properly, like Sonos speakers or Chromecasts. While this is a small, calculated risk, major brands like Google and Sonos invest far more in security than generic smart plug manufacturers.
By making a conscious decision about which devices belong where, you can achieve a near-perfect balance of security and functionality.
My Final Verdict: A 30-Minute Job for Years of Peace of Mind
Setting up a dedicated IoT network is one of the most impactful security measures you can take for your smart home. It’s a simple, one-time setup that elevates your home from a collection of potentially vulnerable gadgets to a secure, well-managed ecosystem.
Don’t put your personal data at risk. Take 30 minutes this weekend, build your digital moat, and ensure your castle remains secure.